Winning Hands Massage
Myofascial Release
General Discussion of MFR
Fascia and Fascial Restrictions have already been discussed in some detail
in earlier sections. Now it is time to discuss fascial release work in terms
of treatment techniques.
Critical aspects in working with fascia are water content, the Piezo
Electric effect, and the Thixotropic Effect. In brief the latter two are
simply big words to mean that a substance (tissue) that has solidified from
a normal gel state can be returned to that gel state via the application of
pressure over time.
There are several ways to determine if fascial restrictions exist in any
particular area. One is simple visual observation. How do the individual’s
clothes fit? Many times, the underlying restrictions will imprint on the
fabric. Another method with experience and practice is observation of
posture. Certain postures are suggestive if not necessarily definitive that
restrictions are present. Are the legs laterally rotated? Are the shoulders
medially rotated?
The primary method, however, is tactile by very lightly running the flat of
the hand in all directions along the skin. Using the back as an example, it
would be from the neck to the waist, from the waist to the neck, side to
side in both directions, diagonally in both directions, left shoulder to
right hip and right hip to left shoulder, as well as right shoulder to left
hip and left hip to right shoulder. If no restrictions are present, the hand
will glide smoothly across the skin with no resistance. But when
restrictions are present, it will feel like the hand is running across glue
or sandpaper. For severe restrictions, the hand will just dig in and stop.
The key is that the assessment must be done at the proper level to properly
engage the tissue. And that level is directly beneath the lymph and before
engaging muscle. In other words, very superficial.
The standard bodywork technique to achieve this is application of a
cross-hand stretch (pressure) along the line of tension or restriction and
then holding (time) until the release occurs. The importance of time cannot
be overemphasized. Releases will frequently occur very quickly. However, if
the stretch or pressure is released too soon, there will be a rebound
effect. In other words, the release will be strictly temporary and the
tissue will resolidify, much like elastic rebounding. The general rule of
thumb is 90 seconds or more. The importance of staying at the correct tissue
level also cannot be overemphasized. If too much pressure is applied, the
muscle tissue is being engaged and not the fascia.
Acupressure Fascial Release
Personally, even though specifically trained in MFR, I rarely use basic MFR
as such these days. I discovered by accident about three years ago that
fascial restrictions will release on their own energetically if two
acupoints that span the area of restriction are held at the same time until
an energetic balance is reached. Two things that are particularly appealing
about releasing fascial restrictions energetically are that (1) the releases
occur on their own, incidental to other work being done, and (2) the client
doesn’t feel like road kill the following day. Long sessions of standard
fascial release work, particularly the more aggressive versions, are frankly
painful to receive and create a temporary tissue inflammation that is at
best described as uncomfortable for the next 24-36 hours. Energetic releases
have neither of these problems.
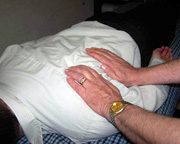
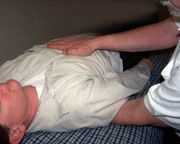
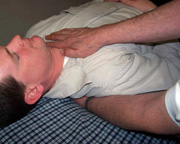
Back Release Pattern
The area where I use this the most is on the back. I actually use three
specific points on each side: Bladder 38, Bladder 42 and Bladder 47.
The "routine" I use is to first access B 38 with my proximal hand and B 42
with my distal hand. I don't apply any more pressure than the weight of the
body on my hands because I generally do the routine with the person supine
on the table. I then simply hold that position. The first thing you will
feel is the energy kicking in. That is followed by a physical sensation of
something squirming or quivering under the skin. That squirming sensation is
the fascia releasing. Because the fascia connects to the muscles and bones,
the third distinct thing you might feel is a contracted muscle suddenly
releasing. And if a contracted muscle is pulling a bone out of alignment,
like the scapula, a rib, or a vertebra, you might also feel a skeletal shift
as well. I have had cases where scaps have rotated in my hand, the sacrum
has dropped, or the pelvis has shifted. You hold until you feel a sense of
balance. For long term, chronic, or severe restrictions it is sometimes
necessary to do the onion layer drill. After you achieve balance, slightly
curl your fingers to access the tissue at a deeper level. And then wait to
see if the energy kicks back in. If it does not, you go on to the second
position pairing. If it does kick in, you stay until a new balance has been
achieved. Also, if the energy does kick back in, you repeat the whole
process by once again curling your fingers to get deeper. You repeat this
cycle until you no longer have the energy kick in when you curl your
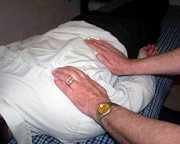
fingers. Once you are done with the B38 and B 42 pair, you move your distal
hand to B 47. Your proximal hand does not move - it stays on B 38. You then
just repeat the whole process for the second pairing. This will basically
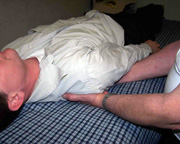
take out restrictions in the full back. In a full body release routine, I
will have already held GB 20 with my proximal hand while having my distal
hand on B 38 before I do the B38-B42 pairing. This addresses any
restrictions in the very upper back/shoulder/neck region.
Fascial diaphragm release
If extended, manual fascial release work is being done, it is
necessary to start the session by first releasing the fascial diaphragms.
Instructions follow.
- Pelvic Diaphragm – hand positions: sacrum/lumbar and just below
umbilicus (between ASIS)
- Abdominal Diaphragm – hand positions: mid-thoracic spine and below
xyphoid process
- Thoracic Outlet – hand positions: around c7 and below clavicle
Begin with light static pressure while visualizing and seeing fluidity
of diaphragm.
Pelvic Diaphragm
|
Abdominal Diaphragm
|
Thoracic Outlet
|
 |
 |
 |
Add slight cross-hand pulls and/or twists to specifically engage
congested areas.
Opening protocol: open pelvic, abdominal and then thoracic (this is a
necessary protocol in any session which includes a significant fascial
aspect and also excellent for facilitating decreased inflammation)
Fascia hooks on bony prominences
Two-point work can use these prominences
Common holds include:
- Ischial tuberosity and pubic tuberosity
- Greater trochanter and ischial tuberosity
- ASIS and PSIS
- ASIS and ASIS
- Greater trochanter and ASIS
- Etc
Two-point work can used in areas of specific congestion. Use same
technique as for diaphragm release. Explore area between two points with
inner eye and send senses outward noticing pulls, tugs, ease.
Home Page |
Mike's Biography and Training |
Treatment Information |
Mike's Recommendations |
Mike's Writing
(c) 2005-2007 Mike Uggen,
Phone: (317) 297-7263
Cell: (317) 508-8556
WA License Number 16912
Web Design by Barbara Uggen-Davis